Showing posts with label DragonCon. Show all posts

Friday, May 29, 2015

A Few Updates

Just checking in here since it's been a while.
I wish I had more to share but life got busy, as it does. With that said, I am once again ramping up for DragonCon 2015 in September, and the costuming frenzy is nearing a fever pitch.
At Big Wow; I'm the Doctor's 'Galactic' mechanic.

Over the last two months, we've also had two local sci-fi/fantasy conventions to San Jose; Big Wow and BayCon. While BayCon was very low-key, we made the fun happen by gathering together with good friends, and just had a good time goofing off in costume.
Big Wow was also a lot of fun, and promises to be even bigger next year.

In other news, of which some of you may already be privy to; I've taken up mermaiding.
"What the hell is mermaiding?" You may be asking yourselves. Well, you can read more about that here:
A Description From Mermaid Kat
Mernetwork FAQ: What Is Mermaiding?
and more, in my blog dedicated to my adventures in fins (so far):
Shimmer From The Deep - Freyja The Viking Mermaid

For now, I'll leave you with a recent photo taken this past weekend at BayCon, while I took a quick dip in the pool with my fins. I'll be updating here soon with posts and/or links to all the costuming projects I have going for DragonCon this year.
XOXO!
Photo by Mary Anne Butler


Thursday, November 13, 2014

The 'Deluxe' Elsa Costume

Here's one photo so far, of my nicer of the two Elsa costumes made this past year.
It's hard to see much detail here, but hopefully there will be more so stay tuned!

Photo by Mary Anne Butler, at Dragon Con 2014.

The wig was still sort of behaving in this photo, but I need to make a new one from a new wig base. I purchased this one and while it's ok, there are some things that could have been done differently for better effect.
Also, the bits of red you see on the bodice are the icy blue sequins reflecting the red carpet ;-)

Friday, September 5, 2014

DragonCon: Lagertha Part I

Anders and I not only had a successful DragonCon, but an insanely fun experience, too!
While this was not our first rodeo when it comes to cons, this was very likely the largest with a record-breaking crowd that topped out at somewhere around 62,000 attendees. That's the last number I heard, but it may have been more. The following posts on Dragon Con are in no particular order, but posts will most likely go up depending on what, and how many photos I have of each costume.
Above: One of my favorite shots from the main floor of me as Lagertha and Anders as Floki; we literally bumped into a guy that had a perfect Ragnar impression. His lady friend also had a pretty awesome first season Lagertha look going. The four of us spent the rest of the evening together raiding various con parties. (and yes, I know my sword is on the wrong side)

I don't have a lot of professional shots where you can see details of the Lagertha battledress, but there are possibly a few in the works.
I also didn't have time to really do my hair the way I wanted. It needed more oomph and while the knot work on top and the braids look ok, the rest looked a bit flat. However, we were dealing with Atlanta humidity and LOTS of people making it even warmer indoors, which is no help to hairdos. I added the little chains too, but next time I'm going to try the softer braided look for the 'fauxhawk' top as seen in this screencap from the show....

I went with this look instead, and added the chains to the side braids that hang down:

Mine. Not perfect, but I haven't mastered doing the tiny french braids on the sides yet:
 I plan to don this ensemble again soon to get more photos, but here are a few of my favorites so far:

Once again, I'm noticing how blue(!) the leather dress looks in some of the photos. particularly the outdoor shots taken in the shade. In person and indoors it looks more muted, and I did indeed weather the surface with a deep tint. In the outdoor shot below the color looks more accurate:

Earlier in the day with Laura as Astrid from "How To Train Your Dragon"
Photo: Mary Anne Butler

Floki and Lagertha taking a rest before the madness of the evenings festivities begin.
Photo: Mary Anne Butler
Floki had to take a time-out in the Ball Pit...

And then Floki made a friend....

And so did I!

So as you can see, the indoor lighting isn't very kind but we all had a blast regardless.
More photos are on the way xoxo

Monday, August 25, 2014

The Final Update Before Dragon Con...

Dear readers, this is it for entries until after Dragon Con.
It's just a few days away and I still have a lot of finishing touches to complete on both the Lagertha battledress and Elsa's gown. However, I do have a couple of images to share as a teaser, and plenty of photos of the final products to share after the madness of con is over.

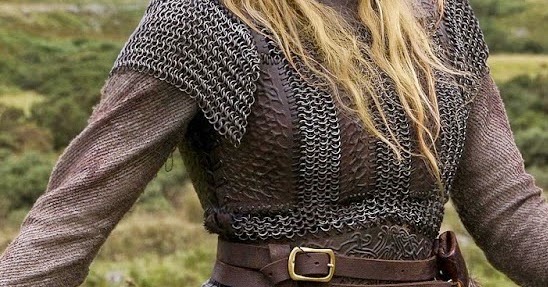
Here's a sneak-peek of the completed chainmaille tunic body. This was before I added the maille shoulder pieces, and had tried it on for fit...and it fit! (whew!)
I left the left shoulder section of maille detached but laced to a small strip of leather. From the closeup photos I had, I noticed this was used. A genius move on the part of the Vikings costume dept., so that way the entire left side of the tunic can open up for ease of dressing & undressing. When put on, that small strip of leather with the shoulder chainmaille piece simply gets tied back onto the rear shoulder section...if that makes any sense. If I have time later today, I can post a closeup of the original showing this detail.

 This was also before I had dyed my leather side laces a darker brown.


There are little to zero clues as to how Lagertha's blue leather dress closes in front. From some of the hi-res pictures, I was able to discern that it closed in front, but how was a mystery. So, once again using my own imagination, I decided to re-purpose a few of the extra rings leftover from the chainmaille as lacing loops.
Even further with my own stylistic leanings, the little holes you see punched in the leather will get some of the brass studs later. or maybe some fancier ones if I can track any down.
I still need to treat the leather to darken and weather is a little, too


I've been taking my own path with the look of the shirt. Keeping a similar color pallet to Lagertha's, but since it's so hard to make out details, or get a clear view of her undershirt collar, I am using my imagination. For mine, I'm utilizing a flax/hemp cord in a slate grey with some of the deep brown leather flat lacing also used on the leather dress. I've also done some extra decorative stitches in a flax thread along the neck seam.
It's definitely rustic looking, but then I'm portraying a Viking queen, not a Disney princess....at least not the entire time ;-)

The beginnings of the armored arm braces...

**Edited to add: Unfortunately the shield is not a go. We were trying to construct it so that it could separate in half for travel, but we just need more time to perfect it and make it hold together more solidly.**
A shield in the making, thanks to my friend Anders. Nearly complete; it just needs its handles at the back and paint. I have a sword he carved from wood and painted to look like the real thing, complete with leather scabbard.

So, stay tuned. There will be a ton of photos to share very soon. Perhaps even during Dragon Con!
XOXO


Thursday, August 21, 2014

Frozen Shoes

Taking a quick break from the Lagertha project, I've finished the shoes for my Elsa ensemble.
These are the same shoes I wore for the Disneyland event a few months ago...for a little while at least. They were brand new and while pretty comfy, I hadn't had time to break them in. My feet were ok with them for about 3 hours but after a few blisters started to show up, I switched to some flats I'd painted a similar color.
Now that these are properly broken in, I decided to give them a facelift since the original paint job was rushed (over a navy color) and none of the "Frozen" modifications I wanted were done.

What follows is truly my own version of Elsa's shoes. I'm not attempting to be dead accurate with these, but I wanted them to at least reflect the general look and colors used on hers.


Using some softer scraps from the tooling leather I used for my Lagertha armor, I created extensions on the vamp of the shoe in a spiky icicle design. Before adding these, I sanded down both shoes thoroughly so that both the glue for the additions, and the new coat of paint would have a surface that they could adhere to.
(Please excuse all the thread, blue clippings and hole punch confetti on my carpet from the leather Lagertha tunic)

 Tools of the trade; sandpaper, glue, hairpins, super sharp scissors and Dutch licorice cats...which have zero to do with this project except that they are tasty. 

To glue these pieces on, I used Aleen's Foamtastic. This is the same brand that makes the Jewel It glue I use to decorate my burlesque costumes in all those Swarovski crystals. I needed something strong that would not only dry clear, but flexible. Normally I would have used some kind of shoe repair glue, but I didn't have any on hand. Alternately, Foamtastic works for this sort of thing because it's made for porous materials. Leather is porous, and this glue is super thick and tacky. It holds while it dries, and doesn't soak away into materials that tend to make more fluid glue vanish before it can stick.
As you can see from the top photo, I still used a few hairpins to clamp the pieces in place while it set. Once that was done, I broke out the paints.

The first coat.

I mixed two colors of Lumiere paints; a plain turquoise and a frosty white metallic to get the shade you see above. After that was dry, I added more of the metallic frost white to the tips of the spikes. Building and blending the layers of the frost for more intensity at the pointy tips, this definitely gave the shoes an icy look.

The finished product! Or do I add more sparkle?

I also shaded some of the frosty white onto the small heels and along the top edge at the back.
Eventually I'd like to find a diamond shaped hole punch, and do a cut-out design on the interior of the spiky pieces for a snowflake look.
I know some people have added glitter to theirs, but I want to keep the snagging effect to a minimum. Granted, spiky things similar to what I added can catch on hemlines, but that's why I used a soft leather that is unlikely to be a problem. Glitter, when glued to a surface, becomes like sandpaper. I really don't want the inside of my hem & the satin lining to catch, scuff or stick to my shoes. Swarovski crystals are an option though ;-)

Monday, August 18, 2014

Lagertha's Battledress: Making Progress

Just a taste of what I've accomplished today with my Lagertha armor...


Of course, some delicious homemade tiramisu helped immensely.


Wednesday, August 13, 2014

Still Kicking

 The Dragon Con sewing has kept me so busy, dear readers that I have had little time for updates.
With the days slipping by toward the zero hour, I need to really utilize my time down to the minutes it seems. I also want to have time to pack up all these costume bits!
With that said, I do have a couple of random progress photos to share here and will have plenty to share after Dragon Con is over. I'm taking photos as I go, and will try to post a full rundown on the creation of both the Lagertha battledress and Elsa's gown.
XOXO

The bodice portion of the Elsa gown is finally getting its sequins, and I'm making really good progress. I may even finish it this weekend.


Here's what I've been doing on my lunch breaks this week; trimming and sanding.
I not only trim the corners to get the right shape of sequin, but to also take down some of the sharpness that could catch on the rest of my costume, my flesh or on other people. I'm roughening the backs of each one with a nail file because I've chosen to glue them on (with Aleen's Jewel It) instead of sewing, and this gives the glue something to grip more securely. For me personally, without little thread stitches holding them on, it gives the icy sequin design a much cleaner look that's closer to how Elsa's bodice appears in the film. It also happens to make the application process much faster!


The Lagertha armor...so many little lacing holes...ouch. My hand hates both me and my hole punch, and I still have two more leather pieces to punch holes in. Funny to think that the tooled designs were actually the easy part. Almost there. I still need to put the little round Norse sun wheel design on the center front of the below piece, but this chainmaille & leather tunic will also likely get completed this weekend!


Thursday, August 7, 2014

Lagertha's Battledress: Leatherwork and Linen

Just a quick photo update on the Lagertha project.

The leather waist piece in the making, with the design inspired by one from an ancient Norse axe head...


 The undershirt (before the sleeves were attached)


Film still of original costume

Sunday, August 3, 2014

Lagertha's Battledress: Blue Leather

Today I was able to get a lot done on the leather dress worn underneath the chainmaille tunic.
Last night I made a muslin mockup using the below pattern as a guide for the seams, omitting the bust dart and shaping the curve a little tighter. Today I got so far along that I have all my pieces cut out of the blue leather hide.

 I got rid of the built up neckline and left it a plain round neckline with a straight opening all the way down the front. I can shape this later once the dress itself is constructed. The neckline on Lagertha's leather dress can't be seen, and I have very little to go on as to any specific shape. So, I may use my imagination and find something that works for me.

'Gee, I wonder if I'll have enough leather' I said to myself in the weeks leading up to this...oh yes, there was plenty. There is a ton hiding under those folds to the right of the photo, and I already have other plans for the remaining scraps. I want to use every last bit.

I briefly pinned the back piece to my form (only on the seam allowance edges) to get an idea of how the leather behaves. it's a heavy garment weight and also intended as a super soft upholstery leather, which makes it the perfect Viking weight.

 Some of these shots might show up as *holy frack that's blue!*, but this leather is a really nice muted lapis blue.

Also, joy of joys, the correct size boot arrived yesterday! I had to exchange sizes after I received the wrong one, but it was easy. Thanks DSW!
They also happen to match the vintage brown suede pants I found on Etsy perfectly.

Friday, August 1, 2014

Lagertha's Battledress: An Early Update On The Leatherwork

Earlier in the week, I began a mockup of the leather pieces that are incorporated into Lagertha's chainmaille armor. Working with a few hi-res images, some heavy cotton denim and a little luck, I set about replicating the shapes onto my not-quite-right dress form to get a general idea of placement.


Yesterday evening after a few adjustments, I traced the pieces onto a giant roll of tooling leather I'd picked up at Tandy leathers in San Bruno. Now that all the pieces are cut, I get to do the tooling designs on each one, with the exception of the back belt piece.

 I've also included the little 'V' section in the center back yoke piece.

 An example of the placement for the front pieces


After I'm finished with the tooling designs, I'll stain the leather a deep brown shade. 

I wasn't sure if this should be curved or straight along the right edge.
It's the piece that goes over what is essentially the 'side boob' and looks curved in the stills I have...

I think a little curve is correct for this, since it will pull the rest of the front into the correct shape to accommodate for a bust line.


Monday, July 28, 2014

Elsa Update: Part II

The Elsa cape arrived!
When I found the package sitting on my front porch after work today, I steeled myself for disappointment. I'd heard mixed reviews about the seller I'd ordered it from, and after getting burned in the past, I had some apprehension.


I opened up the package only to have my nose greeted by a strong plastic chemical smell.
Then the color got my attention; It's blue. Very blue.
Deeper than expected, but still very pretty...but will it work with my costume?


I want to scatter rhinestones on the top portion in the silver areas...

The cape was made by Angels Secret on Etsy, a cosplay costume company.

Then, after I unfurled it from yet another plastic baggy, I noticed all the tiny blue sequins scattered between the snowflake design printed in silver glitter. The epic shimmer it gave off distracted me from the deeper blue color of it next to my own gown. In the following images, it may appear more aqua, but let me assure you that it's closer to a basic blue. The slightly turquoise side, but more cool blue.
It's a super sheer woven net with a slight pattern that reminds me of vintage hat veiling, and the more I unfolded and looked at it, the more I liked it....except for the Velcro they added at the top edge. That's going away as soon as I find my seam ripper.
Overall, it's actually quite stunning and photographs well.

It's SUPER long. Excuse the sewing room mess, and I'll try to get photos of its full spread soon!

There are images and stills of Elsa's cape that appear a much deeper blue than the rest of her ensemble. Additionally, her entire outfit seems to vary in color througout the film depending on environment, lighting and her general mood. So while the quality isn't absolutely stellar, I decided that this cape will indeed work....with a little tweaking of my own.


If you remember the original shimmery aqua net fabric I had purchased for the cape I made my Disneyland version from; I found an entire bolt on sale recently and grabbed it while I could. A good decision since I've decided to layer this super sheer fabric of mine over this cape.
This not only makes it more cohesive with my gown and shirt, it adds an amazing level of icy depth to the look of the material. Even with this layer, it's so sheer that you can still get an intense sparkle from the cape underneath, and still see the shimmery snowflake design clearly.

 My shimmer net draped over the upper top of the cape I received, next to my gown on the right. it's all bundled up so you don't see the sheerness, but it's a good representation of the color effect.

With all that said, I do really like it. Before I add this top layer I'll have Anders take a few photos of me wearing it by itself, with my gown in various lighting, to see if I really need to add it.
Like Tim Gunn always says, "Make it work!"

Elsa Update And The Final Stretch


 Oh gods...four weeks left before Dragon Con...crap.

This past weekend I was able to get the base gown for my Frozen cosplay fitted, lined, hemmed and the seams boned.
The corseted undergarment ended up being a waste of precious time, since I didn't like the way it fit (squashed my boobs a little too much for my taste). I can fix it, but I decided that I just don't have the time to futz with it right now, so I put some sturdy spring steel into the dress bodice itself. This essentially made the dress its own corset, and the fit ended up remaining really smooth where I needed it.
Now I wait for the sequins to arrive from various parts of the world.
With about 4 weeks left of real work time left before Dragon Con, I still have the Lagertha project to complete, and I need to keep my nose to the grindstone with sewing, leather work and chainmaille tunic construction.
But enough with my whining. Here's some things I'm grateful for...

For the Elsa gown; I'm grateful that I already have the shirt I made for the Disneyland costumed event, though I did do some altering to the sleeve armpit areas so they aren't so loose. I also made it off-the-shoulder as it should be. The cape is on its way and should be here by mid-week, I found a fantastic wig and I have the shoes. This ensemble is 80% done.

For the Lagertha battledress; I'm grateful for already having the brown suede trousers, the
boots and nearly all the bits and pieces needed to build this thing. Anders is going to help me find a good fake Viking sword/scabbard and help me build a stage shield that breaks down for travel.

In all, I think this will work. If I can focus after work during the week, utilize my weekends to their full extent and get good chunks of things done every day, I should be golden.