Showing posts with label leatherwork. Show all posts

Friday, September 5, 2014

DragonCon: Lagertha Part I

Anders and I not only had a successful DragonCon, but an insanely fun experience, too!
While this was not our first rodeo when it comes to cons, this was very likely the largest with a record-breaking crowd that topped out at somewhere around 62,000 attendees. That's the last number I heard, but it may have been more. The following posts on Dragon Con are in no particular order, but posts will most likely go up depending on what, and how many photos I have of each costume.
Above: One of my favorite shots from the main floor of me as Lagertha and Anders as Floki; we literally bumped into a guy that had a perfect Ragnar impression. His lady friend also had a pretty awesome first season Lagertha look going. The four of us spent the rest of the evening together raiding various con parties. (and yes, I know my sword is on the wrong side)

I don't have a lot of professional shots where you can see details of the Lagertha battledress, but there are possibly a few in the works.
I also didn't have time to really do my hair the way I wanted. It needed more oomph and while the knot work on top and the braids look ok, the rest looked a bit flat. However, we were dealing with Atlanta humidity and LOTS of people making it even warmer indoors, which is no help to hairdos. I added the little chains too, but next time I'm going to try the softer braided look for the 'fauxhawk' top as seen in this screencap from the show....

I went with this look instead, and added the chains to the side braids that hang down:

Mine. Not perfect, but I haven't mastered doing the tiny french braids on the sides yet:
 I plan to don this ensemble again soon to get more photos, but here are a few of my favorites so far:

Once again, I'm noticing how blue(!) the leather dress looks in some of the photos. particularly the outdoor shots taken in the shade. In person and indoors it looks more muted, and I did indeed weather the surface with a deep tint. In the outdoor shot below the color looks more accurate:

Earlier in the day with Laura as Astrid from "How To Train Your Dragon"
Photo: Mary Anne Butler

Floki and Lagertha taking a rest before the madness of the evenings festivities begin.
Photo: Mary Anne Butler
Floki had to take a time-out in the Ball Pit...

And then Floki made a friend....

And so did I!

So as you can see, the indoor lighting isn't very kind but we all had a blast regardless.
More photos are on the way xoxo

Monday, August 25, 2014

The Final Update Before Dragon Con...

Dear readers, this is it for entries until after Dragon Con.
It's just a few days away and I still have a lot of finishing touches to complete on both the Lagertha battledress and Elsa's gown. However, I do have a couple of images to share as a teaser, and plenty of photos of the final products to share after the madness of con is over.

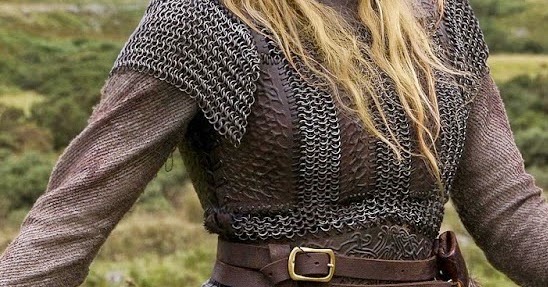
Here's a sneak-peek of the completed chainmaille tunic body. This was before I added the maille shoulder pieces, and had tried it on for fit...and it fit! (whew!)
I left the left shoulder section of maille detached but laced to a small strip of leather. From the closeup photos I had, I noticed this was used. A genius move on the part of the Vikings costume dept., so that way the entire left side of the tunic can open up for ease of dressing & undressing. When put on, that small strip of leather with the shoulder chainmaille piece simply gets tied back onto the rear shoulder section...if that makes any sense. If I have time later today, I can post a closeup of the original showing this detail.

 This was also before I had dyed my leather side laces a darker brown.


There are little to zero clues as to how Lagertha's blue leather dress closes in front. From some of the hi-res pictures, I was able to discern that it closed in front, but how was a mystery. So, once again using my own imagination, I decided to re-purpose a few of the extra rings leftover from the chainmaille as lacing loops.
Even further with my own stylistic leanings, the little holes you see punched in the leather will get some of the brass studs later. or maybe some fancier ones if I can track any down.
I still need to treat the leather to darken and weather is a little, too


I've been taking my own path with the look of the shirt. Keeping a similar color pallet to Lagertha's, but since it's so hard to make out details, or get a clear view of her undershirt collar, I am using my imagination. For mine, I'm utilizing a flax/hemp cord in a slate grey with some of the deep brown leather flat lacing also used on the leather dress. I've also done some extra decorative stitches in a flax thread along the neck seam.
It's definitely rustic looking, but then I'm portraying a Viking queen, not a Disney princess....at least not the entire time ;-)

The beginnings of the armored arm braces...

**Edited to add: Unfortunately the shield is not a go. We were trying to construct it so that it could separate in half for travel, but we just need more time to perfect it and make it hold together more solidly.**
A shield in the making, thanks to my friend Anders. Nearly complete; it just needs its handles at the back and paint. I have a sword he carved from wood and painted to look like the real thing, complete with leather scabbard.

So, stay tuned. There will be a ton of photos to share very soon. Perhaps even during Dragon Con!
XOXO


Monday, August 18, 2014

Lagertha's Battledress: Making Progress

Just a taste of what I've accomplished today with my Lagertha armor...


Of course, some delicious homemade tiramisu helped immensely.


Wednesday, August 13, 2014

Still Kicking

 The Dragon Con sewing has kept me so busy, dear readers that I have had little time for updates.
With the days slipping by toward the zero hour, I need to really utilize my time down to the minutes it seems. I also want to have time to pack up all these costume bits!
With that said, I do have a couple of random progress photos to share here and will have plenty to share after Dragon Con is over. I'm taking photos as I go, and will try to post a full rundown on the creation of both the Lagertha battledress and Elsa's gown.
XOXO

The bodice portion of the Elsa gown is finally getting its sequins, and I'm making really good progress. I may even finish it this weekend.


Here's what I've been doing on my lunch breaks this week; trimming and sanding.
I not only trim the corners to get the right shape of sequin, but to also take down some of the sharpness that could catch on the rest of my costume, my flesh or on other people. I'm roughening the backs of each one with a nail file because I've chosen to glue them on (with Aleen's Jewel It) instead of sewing, and this gives the glue something to grip more securely. For me personally, without little thread stitches holding them on, it gives the icy sequin design a much cleaner look that's closer to how Elsa's bodice appears in the film. It also happens to make the application process much faster!


The Lagertha armor...so many little lacing holes...ouch. My hand hates both me and my hole punch, and I still have two more leather pieces to punch holes in. Funny to think that the tooled designs were actually the easy part. Almost there. I still need to put the little round Norse sun wheel design on the center front of the below piece, but this chainmaille & leather tunic will also likely get completed this weekend!


Thursday, August 7, 2014

Lagertha's Battledress: Leatherwork and Linen

Just a quick photo update on the Lagertha project.

The leather waist piece in the making, with the design inspired by one from an ancient Norse axe head...


 The undershirt (before the sleeves were attached)


Film still of original costume

Friday, August 1, 2014

Lagertha's Battledress: An Early Update On The Leatherwork

Earlier in the week, I began a mockup of the leather pieces that are incorporated into Lagertha's chainmaille armor. Working with a few hi-res images, some heavy cotton denim and a little luck, I set about replicating the shapes onto my not-quite-right dress form to get a general idea of placement.


Yesterday evening after a few adjustments, I traced the pieces onto a giant roll of tooling leather I'd picked up at Tandy leathers in San Bruno. Now that all the pieces are cut, I get to do the tooling designs on each one, with the exception of the back belt piece.

 I've also included the little 'V' section in the center back yoke piece.

 An example of the placement for the front pieces


After I'm finished with the tooling designs, I'll stain the leather a deep brown shade. 

I wasn't sure if this should be curved or straight along the right edge.
It's the piece that goes over what is essentially the 'side boob' and looks curved in the stills I have...

I think a little curve is correct for this, since it will pull the rest of the front into the correct shape to accommodate for a bust line.