Wednesday, August 31, 2011

The Dirndl Project

Currently, I'm working on 3 dirndl dresses but have 2 slots still open between now and Oktoberfest. If yours doesn't need to be for Oktoberfest, I can take on more than those two commissions.
Let me know if you would like one made by sending an email to Vienna@viennalarouge.com.

I will soon be posting photos of the ones I'm working on, so you can see examples.

xoxo

Tuesday, August 30, 2011

When the hours drag...

Some of you that follow me on Facebook may have already seen my posts about this, but I thought I'd mention is here as well.

Uaually, I'm not one for the 'Dollz' or avatar makers.
This one however, caught my eye over at Fuchsia's 18th Century Dress blog.

After a few really slow days at the shoe boutique, this fun little dress up doll made the time waiting for customers fly by.
While still very cartoony, these gals have some pretty accurate designs in their wardrobe. I especially like the zone front bodice ;-)
Here are a couple (of many) that I made...

...my only complaint really, is you can't change their pose.


http://www.dolldivine.com/marie-antoinette.php

Friday, August 26, 2011

Dirndl Drafting

Once again, I'm working on a project or two that has a style rooted in the 17th and 18th centuries, but takes a path from my general theme here.
With Oktoberfest fast approaching, I'm making traditional (or close to it) dirndl dresses for a few lovely folks. Here is one all drafted and ready to be cut. I'll post progress on this and following dirndls as they take shape.

Here's a snippet of history on the dirndl dress:
http://dirndl-dress.com/dirndlhistory.php

Future dress project that I MUST DO...

Ok, something just occurred to me.
Week before last, I had the pleasure of finally seeing my favorite film, Amadeus on the big screen.
I was too much of a wee thing to have seen it, or even remember it, in theaters when it came out.
ANYway, I digress;


"It's Turkish. My hairdresser says that everything this year is going to be Turkish".

;-)

Yes indeed, I want to make this dress and hat......or at least my version of it.
Admittedly while the costumes in Amadeus are great but highly questionable in historical accuracy (the women's in particular, there are zippers up the backs of the dresses for crying out loud!), this one isn't so bad.
BUT, there are issues with it. I can see her panniers poking through, the bodice is cut wrong, are there stays under there?
And if she were that fashion and trend conscious she wouldn't be wearing the old style panniers with it, she'd likely have a bum roll and the skirts might even be hitched up into a "Polonaise" if she were in the city.
I could go on and on, but it's a really fun costume and that is what carries though in the scene. The dress *is* Katerina.
One thing I do love, is that they used the Robe a la Turk concept for the dress. Note the little cap sleeves over long fitted sleeves.

So what would I do with my version?
I would keep the Robe a la Turk concept, but make it more accurate.
The front would be a zone front, as most original engravings and illustrations of this style suggest. The film version has a faux "V" front and I really don't like the way it's done. It looks like part of a high school play stage costume. As though it's just pulled tight around her torso and has built in boning rather than a separate pair of stays. Considering the rest of the costumes in the film with zippers, that is likely the case.


I do love the striped fabrics used, and the way they use them here is pretty spot on. During the late 1770s and early 80s, the more you could pile on your dress and head, the better. I've seen original fashion illustrations that support the same use of drapes and sashes on her skirt. As well, the gold bullion tassels and fringe.
And I really want a walking staff. Perhaps an easy project after a trip to Home Depot?
Hers is a little short, but perhaps that was personal preferance back then?


As for her hat and her hair style; pretty darn near perfect.
I may do a slightly different style in both hat and hair to suit my own tastes, but I'll keep the general concept and materials.

While I must be realistic, this likely won't come to fruition anytime soon. I have my gent's wardrobe to sew first, then mine, then the fun crazy stuff such as the above project.
...meanwhile I'll be hunting for the perfect wide red and white stripe silk.
If that ends up a bust, I could just buy some light ivory silk duchess satin, dye some of it red, and sew strips of each color together, making my own striped fabric. This is doable, since it's trimming and not a whole dress that needs to be striped.

Images care of Costume Dramas Obsession.

Wednesday, August 24, 2011

Swoonworthy....

If you happen to have over $2600 just lying around or burning a hole in your pocket, here is a lovely example of Georgian era adornment.

...and nope, it's not in the Smithsonian. It's on Etsy, of all places.

id=

Tuesday, August 23, 2011

More on the "Inspiration Board"...

To elaborate on the earlier post;
What was just a frame I'd taken a fancy to at Ikea, that ended up sitting in a corner between moves, turned into a fun project.

Virtually any fancy frame can be turned into a great collage/idea board for a craft or sewing area. It also ends up being functional wall art.

Thrift stores, garage sales, flea markets and antique shops can yield a bounty of gorgeous art and picture frames, often at a low price.

Mine came with glass when I bought it new. I didn't have a use for it, so I gave it to a friend that needed an oval cut of glass.
I considered using cork sheeting for the center, against the heavy cardboard it came with. I discovered cork is pricey, and either came in sheets to small, or way more than I needed.
Instead, I opted for poster board, the kind with the foam core, just over 1/8 of an inch thick.
This is a great option, because not only is it much more affordable, it comes in colors! I opted for a slate grey print that almost resembles granite, but I was tempted to buy some in pink, or Tiffany blue...and I may at a later date ;-)
I also found some old fashioned map tacs to use to pin my ideas to said board.


Using the cardboard back that came with the frame, I traced out the shape on my poster board with a pencil, then carefully cut it out (on a cutting mat!) with an exacto knife.
If your frame has no backing board, or nesting groove (where the art and/or glass sits) you can trace, measure the inside size of the frame, and add about 1/2 inch to all sides.
You'll also want to cut a piece of heavy duty cardboard for a backing to the exterior surface you'll be tacking things to.

My frame has little metal tabs that can be bent up and down to hold these in place.
If your frame doesn't have these, they can be purchased at a frame shop or art supply store. They are usually nailed in with a few taps from a hammer.
If your frame isn't wood, and has no options for these tabs, duct tape is your friend ;-)
Same goes for hanging your frame on the wall; most frames have a little spot or a metal hook so it can hang from a nail in the wall, but if not, you can also buy this hardware at the above mentioned sources.

All in all, it's pretty easy.
If you live in an older house with plaster walls, the lighter the frame the better. Or, invest in a stud finder so you can anchor a nail into your wall securely.
The last thing you want is to have your pretty frame, with the lovely collage you worked so diligently on come crashing down, leaving a gaping hole in the wall.

Another option besides using tacks; Ribbons.
You can take narrow ribbon, up to 1/4 inch wide, and run them across the board surface, tacking them with tape in back, to make a diamond pattern.
This way, you can tuck your found images and fabric swatches between the ribbon and board, for a pretty effect.
This is a great tutorial over at 7 Layer Studio, with photos (!), that I sadly do not have of my own board's progress.
Enjoy ;-)
xoxo

Monday, August 22, 2011

Deco Darling...


So as I had mentioned in a previous post, some projects here may be of other eras besides the 18th century. This includes my other obsession; the 1930s.

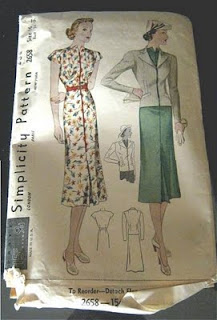
I just finished this dress from a 1938 sewing pattern, using a reproduction 1930s cotton print. The black belt is actually one from the 30s, borrowed from one of my vintage dresses.


I gave the front collar and "sleeves" a facing of black cotton sateen, as well as the front kick pleat (a bit hard to see in the full length photo I took).
The weather is still warm enough where I live, and I plan on wearing it with one of my vintage 30s hats. Perhaps a lovely large brimmed saucer hat ;-)


Friday, August 19, 2011

My inspiration board

I just put this up today. The frame came from ikea ages ago, but I finally got around to putting the foam-core in it, to tack things to. Pictures, lists, material swatches, the possibilities are endless ;-)

Tuesday, August 16, 2011

Rococo-inspired hairdo continued; A Few Tips

In regard to hair and my last post, here are a few tips for those who may be curious...

1. When it comes to styling one's hair, particularly when it comes to curling, take note of your hair type and it's condition. Un-colored/processed hair that is straight is not going to hold a curl as well as naturally wavy or chemically processed hair will.

2. Heat is your friend, but a curling iron will do nothing for you.
invest in hot rollers. skinny ones are the best for historical styles involving ringlets. I have the best luck with my set of Conair Hotstix; discontinued, but they keep re-releasing it in different colors, etc. They are bendy rubber rollers that have a metal coil inside that heats up. Hotter than your average hot roller, but not as hot as a curling iron.

3. Utilize hair pieces and/or wigs as much as possible, mix them into your own styling to create illusion.
This is especially true for 18th to 19th century styles, and hair pieces were used widely. Now that I'm not dying my hair black, it's been difficult to find a match for my natural color that varies from a light to medium blonde.
Human hair pieces can solve this, since you can dye them to match, heat style them and they last longer, unlike synthetics.
And they look less "plastic", for lack of a better term.
I don't have any extra pieces in my hair in the previous photo, but I wish I'd had some on hand.

More info soon!...

xoxo


Monday, August 15, 2011

Rococo-inspired hairdo...

I had to get a photo, and the light at my dressing table was just right ;-)


I used to document and share how-to's more often, but lately if I've taken the time to do a "do", I'm rushing out the door to a performance or evening out. I'm going to try to at least get one snapshot from now on.
My gent tried to get one out in the sunlight, but there was too much glare, so I used my phone to take this one indoors.

We were headed to a showing of my favorite film, Amadeus (director's cut) at a local theater called The Retro Dome. They had a Mozart jam session before the film started, it was great.

Friday, August 12, 2011

Sources, Tips and Tricks?

I've decided to try my hand at metallic bullion decoration for my gent's burgundy velvet frock coat. Also known as Goldwork.
I'm not intent on anything too involved (like the bodice in my header image), but I'd like to do some designs on the self fabric-covered buttons, both on the frock coat and waistcoat.
I figure buttons are a good place to start for a beginner; less surface area.
Something along these lines:
http://goldnstitches.typepad.com/gold-n-stitches/2010/01/goldwork-buttons.html

I have a pretty good idea of how it's done, but I was wondering if anyone knows of some good online tutorials on the subject.

xoxo

Wednesday, August 10, 2011

The question of accuracy in fabrics when on a budget...

I will probably catch some flack for what I'm about to write, but this is just my opinion in a sea of many.
When it comes to sewing historical fashion on a budget, for me personally it's going to require even more research into fabrics used, to make up for lack of discretionary income :-)

So often I see beautiful formal 18th century reproduction gowns at events made of expensive silk in taffetas, velvets, brocade and duchess satins. The keyword here is Formal wear.
Naturally, people who choose to create a formal gown want it to look expensive. Yet more often than not, the materials they desire are too expensive, very rare, or just not available any more...so they choose a modern synthetic range of fabrics in place of actual silk.

I will admit that this can bug me. A lot, but we do what we need to do and use what our wallets will allow. I save my pennies so I can by silks when I find it at a great deal
But, why would it *always* need to be silk or satin in the first place?
Here's an idea; how about cotton?

Cotton prints and wovens during the last 2/3 of the 18th century were in high demand and highly fashionable. They were not only seen in day wear, but often at social functions and dances, even at court(!).
Yet today cottons are overlooked when costumers are on a budget to create a formal ensemble, and instead they end up with a plastic, way-too-shiny acetate or polyester outfit...that I might add, photographs horribly. Seams on poly satin ripple and the fabric doesn't breathe. Acetate can often look too stiff or shiny as well.

That's not to say there aren't some nice blends out there that work quite well, but it's all in how you use it, and being knowledgeable about how the synthetics are going to behave. In drape, fit and texture.

I've used synthetics plenty of times, including the blue gown in the previous post.
That was an acetate cotton blend bengaline (it has a faille texture), and behaved much like a heavy silk. It's sheen wasn't too shiny and the drape was wonderful. I only used this fabric however, because I was familiar with it's content and behavior.

This is a great post about cotton fashion and how it is too often excused as 'casual', or only used later in the century, at another 18th century blog, At The Sign Of The Golden Scissors:
http://thegoldenscissors.blogspot.com/2011/08/cotton-sacque.html

I think one point I should state, is that when the use of synthetic fabrics truly bugs me, is when someone brags about how "perfectly accurate" their polyester ensemble is.....perhaps not for 1782, but 1982?
:-\

Bad wig, blue dress....

This shoot was one I did in Seattle, I think around 2006. The blue dress was one I'd made for Halloween, but had kept adding to it. The hat is now part of a burlesque costume of mine ;-) and the wig, well...it had many more uses, but it's no longer with us. It was after this shoot I quickly realized I really didn't like the look of white wigs, and while this one lends an air of 1920s-Hollywood-does-18th-century, it wasn't something I'd be using in the future.
The costume wasn't meant to be at all historically accurate, but it made for a fun photoshoot...


Monday, August 8, 2011

Test: photo post....

Now I can post inspiring imagery on the go...


sent from my iPhone

Friday, August 5, 2011

A New Look....

Ok, so this is it for now. I took a photo of some striped silk waiting to be made into a gown *sigh*.
I'll fiddle with the layout/header image more later...but I do like it so far.
****Edited to add***
I may also start posting about sewing projects other than the Rococo-related stuff here.
I do a lot of Deco era sewing (1930s-40s) but don't document it much.
It's also what I have time for currently, and the 18th century sewing is more time consuming...at least for what I want to do.
So, if you should spy a random post about a 1937 summer dress, don't worry. We'll be sewing rococo soon enough ;-)
...Of course, I can always mix rococo style with deco too...hmmm, inspiration FTW!

Make it work!

Hmmm, I'm not sure I like the design of this layout. Mainly the spacing between posts, it seems cramped and there is little delineation between subjects.
So, I'm on the hunt for a new look here.
I do like the background, and my header image, but if I find something out there that makes me go "Oooh!" I'll likely change it.

Stay tuned...

Thursday, August 4, 2011

For the gents....

Since the next couple of posts here will likely be about sewing a frock coat and breeches  I'll also be posting info and resources on men's fashion and haberdashery. Including wigs :-)

Fortunately for we historically appropriate types, and the men who are willing, Lacy Wigs has finally released a pretty decent men's 18th century wig.
Like mine in this post, it comes in a "Discount" version...which actually ends up looking better and more realistic than their more expensive "Deluxe" versions.

This one also comes in the same natural hair colors as mine, not just in the overly costumey and synthetic looking white ("White" wigs in the 18th century were a light blonde powdered to a lighter almost white shade).

Here's the link! The wig pictured is their more expensive version, hence the shinier texture of the hair, but the colors are the same:
http://www.maxwigs.com/discount-colonial-man-by-lacey-costume-wigs-p1336.html