Thursday, August 26, 2010

The Wig Arrived...

And I think I can make it work.
I've worked with this style before, but in black, as mentioned in an earlier post.
The only thing that shocked me as I took this one out of the package, was the texture of the hair.
I know this wig comes in various qualities, but instead of having silky hair like my last one, the hair on this blonde one is rather odd.
The texture is a bit crimped, but I think this will actually work to my benefit.
my only worry is that it will look too frizzy, but I think the right styling can fix that. Besides, historically I think the texture of wigs and hair due to all the styling and types of hair used (not all of it was human), caused hair to be a little frizzy anyway back then.

My only gripe; the long ringlets are a bit smooshed, so I may need to moisten them and reset them on some foam rollers...as much as can be done with synthetic hair. A day or two on those should do it.

The below photo is yours truly ;-) wearing the wig in question, right out of the package and brushed out a little. There are a lot of long ringlets that fall from the lower back, but I hid those and draped a few of the shorter ones over my shoulder.

overall, I really like the color. It's close to my own hair color, and if I decide to powder it, the texture should take it nicely.

Tuesday, August 24, 2010

Spangles, where art thou?


I'm on the hunt for those tiny flat sequin-like embellishments, traditionally called "Spangles" or "Paillettes".
There are modern versions in plastic, but I would like to hopefully find the real metal ones, as seen on this waistcoat by Bjarne Drews.
They have proved a bit difficult to find in a color other than gold, but I may have found a few good sources. Two being hedgehoghandworks.com, and The Lacemaker.
If I decide I ever need to cheat and go with some made of more modern materials, Cartwright's Sequins might be a good bet as well.

Sunday, August 22, 2010

So many pattern bits...

These are just for the breeches o_O


Above is the J.P. Ryan fall front breeches pattern.
I figure that starting with the breeches will be best, so I can more easily determine the length of both frock coat and waistcoat.
The waistcoat needs to be long enough at the center front to cover the waistband closures on the breeches, and the coat's front corners need to hit right above the breeches knee band. Perhaps a little higher, but then as now, it's entirely up to the wearer.
Through the 18th c. longer coat lengths were used for business and dress occasions, while the shorter lengths (as short as mid thigh) were used for sport; hunting, etc.
The person I'm making these for is rather tall, so we will probably stick with the longer option.


Saturday, August 21, 2010

Waistcoat fabrics...

Today I was able to find some fabric for my gent's waistcoat.
I thought about going with a gold or cream colored silk taffeta, but instead we found this wonderful sage green/taupe shot silk. It looks beautiful with the burgundy velvet I have for the coat and breeches mentioned here.


We also found this flower and diamond patterned damask for another waistcoat; very 1780s. Perhaps not for wear with the cool-toned burgundy velvet, as its color is a bit on the warm side, but it would be nice with a dove grey, cream, or even deep gold coat & breeches.

I hope I have time this weekend to at least get started on the coat!


Thursday, August 19, 2010

The (almost) Lost Art Of Fly Fringe

Thanks to this little tutorial, those of us willing and patient enough can learn to recreate fly fringe, also known as fly braid. There are varying degrees of complexity, ranging from seemingly simple, to layered multitudes of color and texture.


This was a popular form of trim found on many gowns during the 18th c., and in some cases, even found on ensembles from the 19th century.

Follow this link and learn to get "knotty", the 18th century way (Ha! yeah, I know that was bad).
http://www.quaintrellelife.com/fly_fringe.html


Modern wigs and making them work for 18th C. styles

The hair.
In some cases, it's all about the hair.
And it has to be right, otherwise you run the risk of looking "costumey".
We've all seen it, or had to deal with it ourselves; that Halloween costume wig at an historical event, its synthetic fibers gleaming with a blinding sheen from any light source that hits it. Worst of all, from the camera flash.
Synthetic hair shine can be tamed down, and a little shine is ok. It's when the hair *looks* plastic, and that's a common problem.
Victorian style hair falls, braids and pieces are one thing, but the 18th century dos from the last third of the century are particularly difficult.
All the piling, winding, smoothing, bouffanting(is that even a word?), bunting, pomading, gluing, curling and balancing.
In some cases, such as wig and hair styles of the 1770s, the less 'natural' the better. Again, just don't let it look too shiny, gods forbid.
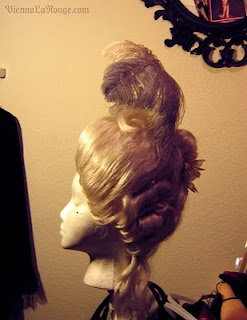
Here is an early experiment of mine, using a costume wig and stuffing from an old pillow (Obviously shiny, before I applied powder).


Then in the 1780s and 90s, hair became this kind of large, free flowing teased halo of waves, curls or frizz, often with tendrils of long ringlets cascading from the neck down the back, or caressing a shoulder.
I did this style once with a costume wig called the Alonge, made by a wig co. called Lacey.
I wish I had photos of this wig after my alterations to it. My only problem was that the wig I had was black, and I wanted blonde.
I just bought a blonde one via Ebay, and it's on the way to me now.
Many people think that everyone had white wigs during the 18th c., but most of those were actually a medium to light blonde, then powdered. Red and deep auburn/brown was also popular, powdered or not.
This is the Alonge wig in blonde, un-brushed:

But with the previous one I had in black; by brushing out the curls on top and trimming/teasing as needed, it created the perfect Georgian era hairstyle. I ended up trimming away some of the long ringlets that hung down from the lower back of the wig, only keeping about 4 or 5 at the center back. I brushed up and styled the trimmed ringlets into the rest of the wig.
It looked amazing, but again, it was a random experiment I did while bored. I thought about powdering it, but didn't really want a black wig powdered. It just made me think I would end up with an 'old lady with grey hair' look.

When I get the blonde wig, I will post my progress with tips and photos, so you can see how I do it. I'm going for a look similar to the styles in these portraits:


Oh! Tip of the day in regard to making powdered wigs; Instead of using powder then hairspray, or vice-versa; Use hairspray to do most of your setting, then spray lightly with that temporary hair color spray in white. Or even pink or blue, popular 18th c. "costumey" colors for wigs ;-)
Start light for lightly powdered look, then add more coats for a more heavily powdered look.
Kryolan is the best, and used by theater and film professionals:
http://www.alconeco.com/products/character/temporary_hair_color/kryolan_color_spray
If you don't want a powdered look, but want to cut the shine of a synthetic wig, use a spray color that matches your wig color.

xoxox,
~Vienna